You are not expected to bring your own blade holder, but it is a good idea to have one if you're going to do lots of vinyl work. Ours might be missing/damaged/worn (who knows!) so for the best results, pick one up for $30: http://www.uscutter.com/USCutter-MH-Blade-Holder
The vinyl cutter uses only vector artwork. Any bitmap images or raster effects in your file will be ignored. Unlike laser cutters, the vinyl cutter software doesn't care about line thickness or color, or whether shapes have any fill colors specified. If your artwork depends on strokes or fill patterns, then you'll want to convert them to pure paths before import (Illustrator can do this well; Inkscape not so much). Otherwise, the cutter will only follow the center line of any stroke while ignoring its width; fill patterns will be ignored altogether.
You'll need to reverse your artwork when cutting heat transfer film and toner or sublimation transfer paper, but not when cutting signage vinyl or contour cutting inkjet heat transfers. You can either reverse it ahead of time or within the vinyl cutter software.
Sure Cuts a Lot had trouble importing PDF and EPS files exported from Inkscape. It was able to import "Plain SVG" just fine. Any fonts used by the SVG file will have to be installed locally on the same computer, unless you convert your text to paths ahead of time.
You'll see the vector outlines in red when first importing your file (in the preview window) and later on when you hover the mouse over individual shapes. Pay them attention as these are the actual paths that will get cut. If you see any overlapping artwork, a quick fix is to select all shapes, open the pop-up menu with a right click, and choose Path->Union to combine everything into a single non-overlapping compound path.
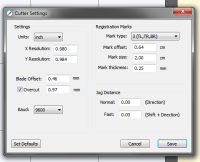
Cutter settings Double check the Cutter Settings dialog once before starting. Note any numeric values you enter will change slightly the next time you open the dialog (floating point rounding errors?):
X Resolution: 0.980, Y Resolution: 0.984. The hardware itself will cut slightly oversize dimensions, so this provides a correction in the software.
Blade Offset: 0.5. The correct blade offset depends on the angle of the blade. For a 45° blade, which is the most common type and should be already installed in the blade holder, the correct offset is 0.5mm. This YouTube video explains what this setting is for.
Overcut: 1-2mm. Should be enabled and set to something small, but exact value doesn't matter. It overlaps the cuts on closed shapes to make sure they are completely cut out.
Hardware
Verify the knife height in the blade holder is set correctly. The tip of the knife should just barely protrude past the end of the blade holder. To check it, remove the blade holder (by unscrewing the brass locking knob on the carriage), hold it in your hand like you would a pen, then use medium pressure to cut a little square or circle in your material. It should cut all the way through your vinyl (i.e. it weeds easily without tearing), but should not break through the release liner underneath (scoring the release liner is ok). To adjust the height, loosen the brass locking ring on the blade holder, rotate the silver ring to move the blade holder barrel up or down, then re-tighten the brass ring to lock the height setting in place.
Always set the origin on the cutter before starting each new cut. Press the Offline/Pause button, then use the arrow keys to position the carriage and feed the material to where you want to start cutting from. Be sure to finish by pressing the Origin button, and not pressing the Offline/Pause button a second time.
Speed: 100mm/s, Force: 100g are good starting points (settable on the MH control panel). Double check these as they are easy to change on accident (e.g. you intended to move the carriage but forgot to press the Offline/Pause button). You can press the Test key (don't forget to set origin first) to cut a small builtin design and verify the speed/force settings are correct for your material (i.e. make sure it weeds easily).
If the software complains that it can't communicate with the cutter try power cycling the cutter (power switch on the left side against the wall). Merely pressing the Reset button on the cutter wasn't enough to resolve this. This error has only happened occasionally, and only right before starting a new cut.
There's a ruler on the front and back of the cutter. Lining up your vinyl with both helps ensure it will feed (aka. track) straight through. While in Offline/Pause mode (i.e. when the LED next to that button is lit), you can verify your material tracks correctly by manually feeding it using the up and down arrow keys. It doesn't have to be perfectly straight, just straight enough to complete your cut without the blade running off of the edge.
Make sure all 3 pinch rollers are engaged on your material, even if it's not very wide. Also make sure that every pinch roller wheel is positioned only over the knurled part of the metal feed roller underneath. Right above the slot, there are two white marks (like a wide upside-down U) to indicate the area you should stay away from with the pinch rollers.
Be sure your material's release liner is facing down when loaded into the cutter. Signage vinyl goes in paper side down. Heat transfer film goes in glossy side down.
If your material is still slipping, you can adjust the clamping pressure using two thumb screws on top of the pinch rollers. You should also leave some slack in your material between the feed rollers and your roll of vinyl, so the cutter doesn't have to struggle when feeding new material. Likewise, double check that your material hasn't tracked off of a pinch roller or tracked all the way against the sides of the slot.
Verify that the locking knob on the carriage is tight and the blade holder is secure. When cutting thicker and tougher material like StripFlock or glitter, it's possible for the blade holder to ride up in the carriage clamp and stop cutting altogether. Double check that the lip of the blade holder is resting directly on top of the carriage clamp. If it keeps riding up, try wrapping some blue painter's masking tape around the blade holder where the carriage clamp will grip it.