Filament Respooler
Asmbly has a (mostly) 3D Printed filament respooler designed to transfer filament from one spool to another.

Safety
Universal Safety
- Be aware of your surroundings, especially when handling large materials.
- Do not approach anyone operating equipment. Stand patiently in their field of view.
Equipment-Specific Safety
No special PPE is required to use this tool.
Use Case
Asmbly has a number of BambuLab P1S 3D Printers with Advanced Material Systems (AMS). The AMS units allow up to four filaments to be used simultaneously. However, these units are more picky about the filament spools that they support than our other printers. Filament spools need to be within a certain range of sizes, and cardboard spools may not be used without protective rings that protect the cardboard from the drive wheels that spin the spools. If there are any dents or cracks in the spool, the AMS will not like it.
Asmbly has constructed a respooler designed by Miklos Kiszely, enhanced with an aluminum axle to replace one that experiences heavy wear in the standard model.
Respooling a spool takes a few minutes, and does not require a Skedda reservation.
Materials
Material Limits
Most 1kg or smaller spools should work in the respooler. We have a variety of sizes of spool centering discs, ranging from 50mm to 75mm. More sizes can be created if there is demand.
Consumables
There are donated plastic spools on the shelving unit in the back corner of the MPR. You are welcome to transfer your filament to those spools and take the spools home as you need to. If you see the stock of donated spools getting low and you have plastic spools that you don't need, we would appreciate donations. But if there are a dozen empty spools, we're probably all set and don't need more.
Blue painter's tape should be available around the shop.
Operation
-
 Reciever spool with centering disc
 -
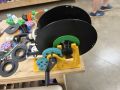 Receiver spool on carriage
 -
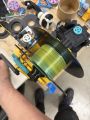
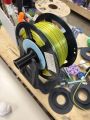 Donor spool on carriage
 -
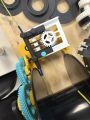
 Feeding the filament through the tube
 -
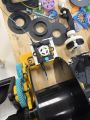
 Adjusting the tube placement
 -
 Aligned tube
 -
 Winding


To start, find centering discs that fit your donor and receiver spools. It is important to get a good fit at least on the receiver spool, because a wobble will make the winding uneven. There are color-coded pairs of centering discs ranging from 50 to 75mm.
Place the centering discs on the sides of your spools and screw on the spool axles. Note that these screws are left-hand threaded! They tighten counterclockwise and loosen clockwise. This is so they don't loosen as you operate the respooler. If you try turning them and they seem impossible to loosen, try turning the other direction.
The receiver spool needs to have an axle with a gear on it.
Place the receiver spool on the yellow side of the respooler with all of the gears and the donor spool on the black side. And crank the handle to make sure the gear is seated properly. It should turn easily. If it takes a lot of force, the gear is probably not aligned properly.
As you turn the handle, you will see the feeder carriage move from side to side. You want it aligned so that it moves from one side of your spool to the other evenly, rather than lingering too long on one side. You can do this by winding the carriage until it reaches one side of its travel. Loosen the lower pair of thumb screws and move the filament tube so that it just touches the side of the spool. Finally tighten the thumb screws and crank through a full cycle to make sure it's properly aligned. See the designer's video if this explanation is unclear.
Now feed filament from the donor spool through the tube and attach it to the receiver spool. The receiver spool may have a hole to insert the end of the filament into, but it may be easier to just stick it in place with blue tape.
Crank the handle clockwise with even force to transfer the filament. If it suddenly becomes hard to turn the handle, the receiver spool's gear has probably gotten misaligned. Without releasing tension on the handle, realign the gear. If you let go of the handle, your filament will probably loosen and you'll be sad.
When the filament is transferred, tuck the end through the holes in the spool so that the spool doesn't loosen (you always do this, right?). Remove the axle by unscrewing it. Note that these screws are left-hand threaded! They tighten counterclockwise and loosen clockwise. If you try turning them and they seem impossible to loosen, try turning the other direction.
Feeds and Speeds
It takes a few minutes to hand crank filament from one spool to another. Don't go so fast that the friction starts to melt the plastic where the receiver spool rests in the carriage! It might be tempting to try using a drill to speed things up, like the designer does in some of the videos. Every time I've tried that, an axle has broken.
Universal Cleaning Guide
- Return the equipment to neutral.
- Sweep up any dust and debris around the tool, your table top, and the floor - both in the equipment area and your work area.
- Clear the floor of any tripping hazards, like power cords.
- Empty trash cans and dust collectors that are halfway full or more into the Asmbly dumpster behind the workshop.
- Leave the shop 110% better than you found it.
Tool Specific Cleaning Guide
Please keep the centering discs and axles arranged neatly.